
You received a threatening email from an anonymous account. Or maybe a highly convincing phishing attempt from someone claiming to be your boss. The “From” address says [email protected], but something feels off.
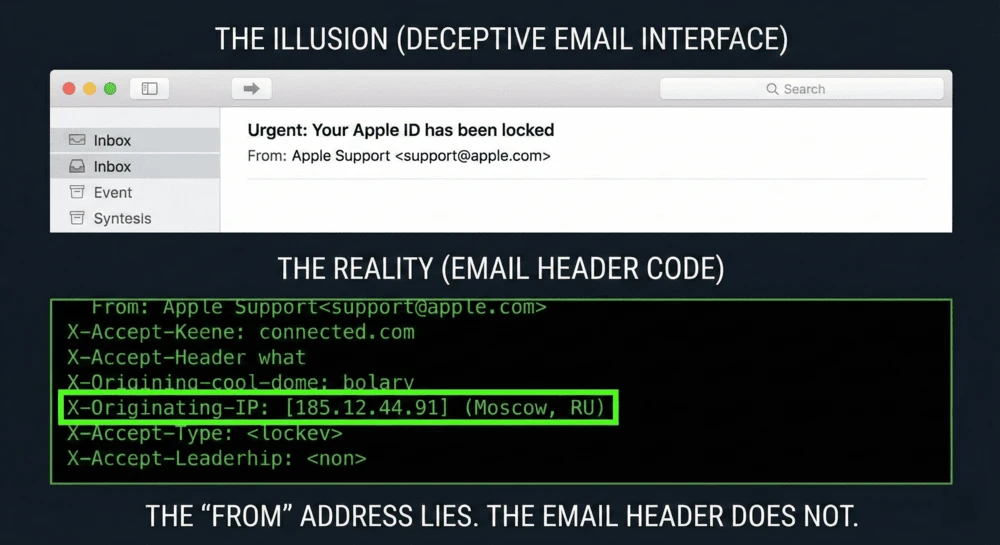
Scammers can easily fake (spoof) the name and email address you see on the screen. But they cannot fake the Email Header.
The header is a hidden block of code attached to every email. It acts like a digital shipping label, recording the IP address of every server the email touched. Here is how to crack it open and find out where the sender is actually located.
Step 1: Extract the Hidden Header
The header is intentionally hidden by your email provider so it doesn’t clutter your screen. You need to reveal the “Raw Code.”
How to find it:
- In Gmail: Open the email. Click the three dots (More) next to the “Reply” button. Select “Show original.” You will see a giant wall of text. Click “Copy to clipboard.”
- In Outlook (Web): Open the email. Click the three dots > View > View message details. Copy the text.
- In Apple Mail: Open the email. Go to the top menu: View > Message > Raw Source. Copy the text.
Step 2: Decode the Matrix (Header Analyzers)
Do not try to read the raw code yourself. It is a confusing mess of code and server hops. Instead, use a free analyzer tool to translate it into plain English.
The Best Tools:
- Google Messageheader (Fastest and cleanest)
- MxToolbox Email Header Analyzer (Best for deep technical analysis)
How to use them:
- Paste the giant block of text you copied in Step 1 into the tool.
- Click Analyze.
What to look for: The tool will show you a table of “Hops” (the route the email took). You want to look at the very bottom of the list-the “Hop 1” or “Originating IP.” That is the IP address of the device or server that sent the message.
Step 3: Geolocate the IP Address
Now you have a string of numbers (e.g., 198.51.100.14). It is time to find out where that computer is sitting.
How to trace it:
- Go to an IP database like IPLocation.net or WhatIsMyIP.com.
- Paste the Originating IP address into the search bar.
The Result: The tool will tell you the Country, City, and Internet Service Provider (ISP) of the sender. If your “boss” is emailing you from a local IP in New York, it might be real. If the IP is registered to a server farm in Nigeria or Russia, it is a scam.
Pro Tip: Once you have the IP address, you can plug it into our Shodan OSINT Guide to see exactly what kind of server the scammer is using.
⚠️ The “Webmail” Exception (The Candor Check)
We have to be honest: this method is not a magic bullet for every email.
If the scammer logged into Gmail.com or Yahoo.com through their web browser to send the message, the originating IP will just show Google or Yahoo’s corporate servers in California.
However, this method works perfectly if the scammer:
- Used an email app on their phone or computer (like Outlook or Apple Mail).
- Used their own custom domain or a bulk-mailing server (which most sophisticated phishing rings do, often tied to a fake domain you can investigate using our Website Owner Guide).
- Sent the email from a compromised corporate network.
Summary: The Header Protocol
| Step | Action | Goal |
|---|---|---|
| 1. Extract | Click “Show Original” | Get the raw email code. |
| 2. Decode | Paste into Google Messageheader | Find the “Originating IP” address. |
| 3. Geolocate | Search the IP on IPLocation.net | Find the physical city and country. |
The Bottom Line
Never trust the “From” line of a suspicious email. It is as easy to fake as a return address on a physical envelope.
Always open the header and look at the digital postmark. By tracing the IP address, you can instantly tell the difference between a local colleague and a foreign scammer.
Next Step: Did you trace an IP back to a suspicious company server? Use our Company Legitimacy Guide to see if that business is a registered shell company.
